
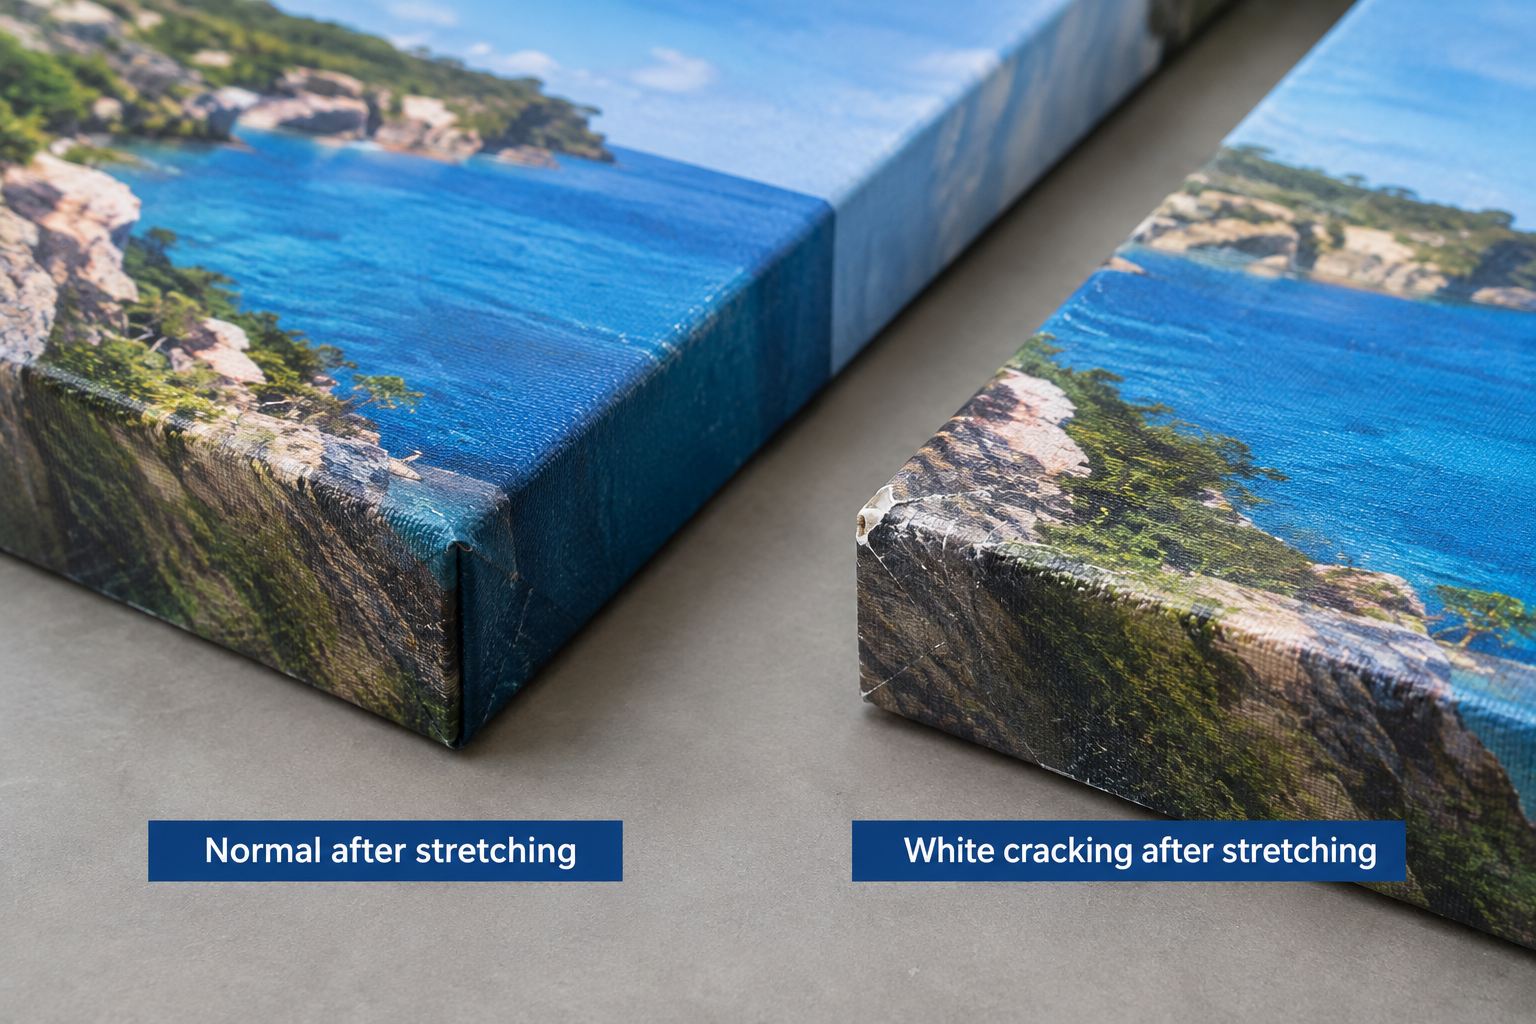
A printed canvas can look correct while it is still flat, but show white lines, cracking or surface damage after it is stretched around wooden stretcher bars. This usually happens around the outside edges and corners, where the printed surface bends, folds and receives the most mechanical stress.
The important point is that this problem should not be blamed automatically on the canvas, the ink, the printer or the stretcher bar. A stretched canvas is a complete production system: printable canvas rolls, ink, drying or curing, optional coating, stretcher bar profile, stretching tension, corner folding and workshop handling all affect the final result.
This article explains the practical causes of cracking, whitening and flaking after stretching, and how to test the full production process before approving a canvas for bulk orders.
What Is Actually Happening When Printed Canvas Turns White?
When a printed canvas turns white at the edge or corner, it does not always mean that the canvas fabric itself has failed. Several different problems can look similar from a distance.
- Ink-layer cracking: the printed ink film cracks when the surface bends, exposing the white coating or substrate underneath.
- Coating cracking: the ink-receptive coating itself cracks under bending stress.
- Flaking or delamination: ink or coating lifts away from the canvas surface instead of only forming fine surface cracks.
- Abrasion damage: the printed face is scratched or rubbed during handling, stretching or contact with tools.
- Corner overworking: repeated folding, pulling and repositioning at the corner breaks the surface more severely than a straight edge bend.
For production teams, these differences matter. A fine white line at a bend may come from surface cracking, while loose flakes or lifting coating suggests a more serious adhesion or compatibility issue. Clear photos of both straight edges and corners help separate these conditions before deciding what to change.
Why Flat Print Quality Is Not Enough
A flat print test confirms color, sharpness, black density and ink control. It does not confirm whether the printed surface can tolerate the final finishing process.
This is why a canvas sample should not be approved only because the image looks good after printing. If the final product is stretched canvas or gallery wrap, the approval test should include the real finishing method.
A practical approval sequence is:
- Print the test image using the intended printer, ink and settings.
- Allow the print to dry or cure according to the ink system and workshop conditions.
- Apply the normal protective coating or varnish if it is part of production.
- Stretch the printed canvas over the actual stretcher bar profile.
- Inspect straight edges, wrapped sides and folded corners.
- Check dark, high-density and detailed image areas for cracking, whitening, flaking or abrasion.
This step is especially important for gallery-wrap products because the printed image continues around the side of the frame. A small edge defect that would be hidden inside a traditional frame may become visible on a gallery wrap.
Cause 1: The Printable Canvas Coating Is Not Flexible Enough for the Application
Printable canvas needs a surface coating that can receive ink and control dot gain. That coating must also tolerate the intended finishing process. A surface that works well while flat may still crack when bent sharply around a stretcher bar.
The risk is higher when the bend is tight, the printed image is dark, the corner is folded several times, or the coating has limited flexibility. The risk can also change with storage history, temperature and production conditions, depending on the coating system. This does not mean every coated canvas is fragile. It means the coating must be evaluated for the way the finished product will actually be made.
Material composition also matters. Cotton, poly-cotton and polyester canvas products can behave differently during printing and finishing. For material selection background, see Gowin’s cotton, poly-cotton and polyester printable canvas guide.
Cause 2: Ink and Coating Compatibility Is Not Right for Stretching
The printed surface is a combination of canvas coating and ink film. Different ink systems form different surface layers after printing. Water-based pigment, eco-solvent, UV and latex workflows do not behave in exactly the same way, and even within one ink type, printer settings and ink load can change the result.
When ink sits as a less flexible layer on top of the coating, bending can create fine cracks. In some cases the crack only exposes the white layer below. In more serious cases, the ink or coating may lift, flake or separate.
This is why the same canvas may perform acceptably with one print setup and fail with another. The question is not only “Is this a good canvas?” but also “Does this canvas, coating, ink system and finishing process work together?”
Cause 3: The Print Was Not Fully Dried or Cured Before Stretching
Insufficient drying or curing can make a printed canvas more vulnerable during handling. The surface may still be soft, tacky or sensitive to pressure. Stretching too early can increase the chance of marking, scuffing, transfer, edge cracking or coating damage.
There is no universal waiting time that applies to every canvas and ink system. Drying or curing depends on ink type, ink load, printer settings, room temperature, humidity, airflow and whether the print is rolled, stacked or left open to air.
For production approval, use the same drying or curing practice that will be used in bulk production. If the print normally waits overnight, test it that way. If a heavy-ink dark image needs longer in your workshop, include that condition in the test.
Cause 4: Protective Coating May Help, But It Is Not a Universal Fix
A protective coating, varnish or laminate can improve surface handling in some canvas-print workflows. It may reduce scuffing, add a more uniform surface, or help support the printed layer during stretching.
However, coating is not a magic solution. The coating must be compatible with the ink, canvas surface and finishing process. Some coatings can become too stiff, be applied unevenly, or react differently depending on print density and drying conditions.
If protective coating is part of your normal process, test the canvas with that exact coating method before approval. If your process does not normally use coating, do not assume that adding one will automatically solve edge cracking without sample testing.
Cause 5: Stretcher Bar Profile and Edge Geometry Increase Bending Stress
When printed canvas wraps around a wooden stretcher bar, the outside surface travels over the outer edge of the frame. That edge creates bending stress. If the edge is sharp, rough or poorly matched to the canvas, the printed surface can be damaged more easily.
Profile depth, edge radius, corner construction and gallery-wrap geometry all affect the way the canvas bends. A deeper bar does not automatically cause cracking, but the finished structure gives the canvas a different bending path and corner fold than a shallow frame.
For this reason, the canvas should be tested on the actual wooden stretcher bars planned for production. If you are comparing frame profiles, Gowin’s stretcher bar thickness guide explains why profile selection should consider frame size, canvas weight and final structure together.
Cause 6: Stretching Tension Is Too High or Uneven
Controlled stretching is not the same as pulling the canvas as tightly as possible. Excessive tension increases stress along the edge and can make the printed layer more likely to crack. Uneven tension can also concentrate stress in one corner or along one side.
Hand stretching, pliers, stretching machines and different operator techniques can all create different results. A canvas that survives one controlled process may fail if pulled harder, folded repeatedly or stretched unevenly during production.
When troubleshooting, compare the same printed sample under different tension levels where practical. If cracking reduces when stretching is slower and more even, the issue may be process-related rather than a media defect alone.
Cause 7: Corners Are More Difficult Than Straight Edges
Corners are usually the most demanding part of a stretched canvas. The canvas is not only bent over one edge. It is folded, layered, pulled and sometimes adjusted several times before stapling.
This is why a sample may pass a straight-edge bend but still fail at the corner. Dark printed corners are especially useful for testing because small white cracks become visible quickly.
During approval, inspect both the straight wrapped side and the folded corner. If damage appears only at the corner, the cause may involve folding method, corner geometry, repeated manipulation or local tension, not only the flat canvas surface.
Cause 8: Abrasion and Handling Damage During Production
Printed canvas can also be damaged by the production environment. Rough tables, dirty work surfaces, hard tools, canvas pliers, sharp wood edges, repeated sliding or face-down handling can all mark the printed surface.
Abrasion damage may be mistaken for coating failure. Check whether the marks follow the contact points of tools, table edges or handling areas. Also inspect the back of the wrapped edge and the wooden frame surface. A rough spot on the stretcher bar can create local stress or rubbing during stretching.
A Practical A/B Test for Canvas Cracking Problems
The goal of troubleshooting is to isolate variables. Start with a few controlled comparisons that match your real production conditions.
- Same canvas and same print, but different stretching tension.
- Same canvas and same print, but different drying or curing time.
- Same canvas and same print, but different stretcher bar edge/profile.
- Same canvas and same process, with and without the normal protective finishing layer.
- Approved previous canvas and new canvas tested under the same printer, ink and stretching process.
If the defect follows one variable consistently, you have a better starting point. If the same roll fails while an approved previous canvas passes under the same process, supplier investigation becomes more reasonable.
When Should the Canvas Supplier Investigate?
A supplier investigation is reasonable when controlled evidence points toward the media. Examples include:
- An approved previous batch works, but a new batch repeatedly fails under the same controlled process.
- Cracking or flaking occurs across multiple rolls from the same production batch.
- The coating appears unusually brittle or inconsistent compared with previous samples.
- A/B testing points toward the media rather than stretching tension, drying or handling.
Even then, evidence suggesting a media problem is not automatically proof of supplier fault. The most useful discussion starts with clear test conditions, photos and comparisons.
What Information Should You Send the Supplier?
Keep the report short and practical. Include:
- Canvas model, roll number or batch information if available.
- Printer model, ink system and relevant print settings.
- Drying or curing condition before stretching.
- Whether protective coating, varnish or laminate was used.
- Stretcher bar profile, depth and corner structure.
- Stretching method and whether pliers or a stretching machine were used.
- Clear photos of straight edges, folded corners and dark printed areas.
- Comparison with an approved previous batch if available.
If the original issue involves ink spreading before stretching, that is a different investigation path. Gowin’s ink bleeding and spreading guide explains how to separate printer, ink and media causes during flat printing.
How to Approve Printable Canvas for Stretched Canvas Production
The safest commercial lesson is simple: do not approve printable canvas only as a printing substrate. Approve it for the final application.
For stretched canvas or gallery wrap production, test the intended canvas, printer setup, drying or curing process, protective coating if used, real stretcher bar profile, and normal stretching method together. This reduces the risk of discovering a finishing problem only after bulk media has been purchased and printed.
FAQs
Can printable canvas be stretched after printing?
Yes, many printable canvas products are used for stretched canvas and gallery-wrap production. The important point is to test the printed, dried or cured, and finished canvas on the actual stretcher bar profile before approving bulk production.
Why do white lines appear on dark printed canvas edges?
White lines often appear when the printed ink layer or coating cracks at the bend and exposes the white coating or canvas base underneath. This is easiest to see in dark or high-density printed areas.
Does varnish always prevent cracking when stretching canvas?
No. A compatible protective coating may improve handling in some workflows, but it does not universally prevent cracking. The varnish or coating must be tested with the canvas, ink, drying condition and stretching process used in production.
Request Canvas and Stretcher Bar Samples for Testing
If your finished product will be stretched canvas or gallery wrap, send us your canvas application, printer and ink system, required finish, stretcher bar profile and expected production method. We can help confirm suitable sample options for testing before bulk order.